
Universal Guide for Using FIDO2 Keys
Operating Systems and Browsers Support
Check platform and browser support before proceeding.
For detailed information on how FIDO2 authentication is supported across different operating systems and browsers, including specific considerations and limitations, please visit our comprehensive
guide.
1. Setup Your FIDO2 Key
Before using your FIDO2 key, you need to start with securing it. This involves creating a PIN and enrolling fingerprints, where available. Proper setup ensures that your key works seamlessly with your accounts and adds an extra layer of security.
- Create a PIN: Start by setting up a secure PIN for your FIDO2 key. This PIN will be required to unlock the key, adding an additional layer of security beyond just the key itself. Use one of the tools available to create a PIN.
For Linux, refer to this page. For iPhone and Android, use the Companion App .Use the Windows 10/11 built-in tool to set up and manage your FIDO2 key:
- Insert the FIDO2 key into your computer.
- Open Settings > Accounts > Sign-in options > Security Key.
- Click Manage and follow the prompts to set or change your PIN.
Safari does not support managing FIDO2 keys. Install and use Google Chrome instead:
- Insert the FIDO2 key into your computer.
- Open Chrome and type
chrome://settings/securityKeysin the address bar. - Follow the prompts to set or change your PIN.
- Enroll Fingerprint: If your key has biometric features such as a fingerprint scanner, you will need to enroll your fingerprint. This usually involves scanning your fingerprint several times to ensure accuracy. Follow the manufacturer's instructions to complete this process.
For Windows systems, the easiest method is to use the Control Panel ( "Settings" → "Accounts" → "Sign-in options" → "Security Key" and click "Manage"). We have tools available for other platforms as well.
2. Check Service Instructions
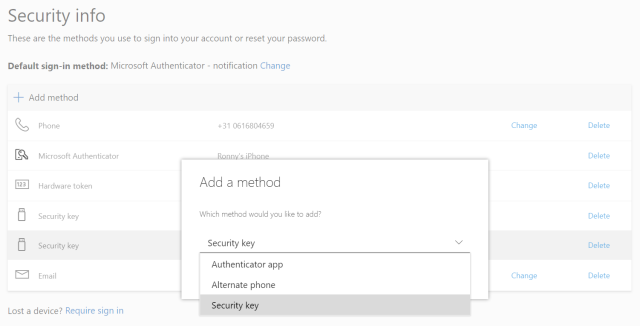
Once the PIN (and/or fingerprint) is set, you can add the key to your authentication service. Different services might use various terms for FIDO2 keys. It's important to identify the correct terminology and follow the specific instructions provided by the service to ensure proper setup.
Identify Key Type:
- "Security Key"
- "U2F Key"
- "Passkeys"
- "FIDO2"
These terms might be used interchangeably depending on the service. Understanding which term your service uses will help you follow the correct instructions.
Service-Specific Instructions:
- Visit the support or settings page of the service where you want to use your key. Look for sections related to two-factor authentication (2FA) or security settings.
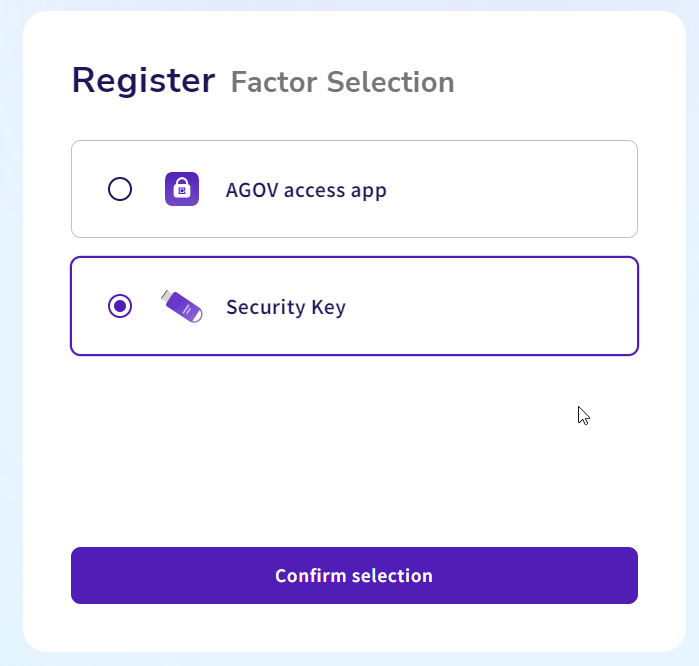
- Find and select the option to add or register a new security key. This section will guide you through the process of linking your FIDO2 key to your account.
- Follow any additional instructions provided by the service, as they may have specific steps or requirements for registering your key.
The exact page or window for registering your FIDO2 key may differ depending on the service. However, it should generally be intuitively easy to find, typically under "Security Settings" or "Account Settings". Below are examples for a few popular services:
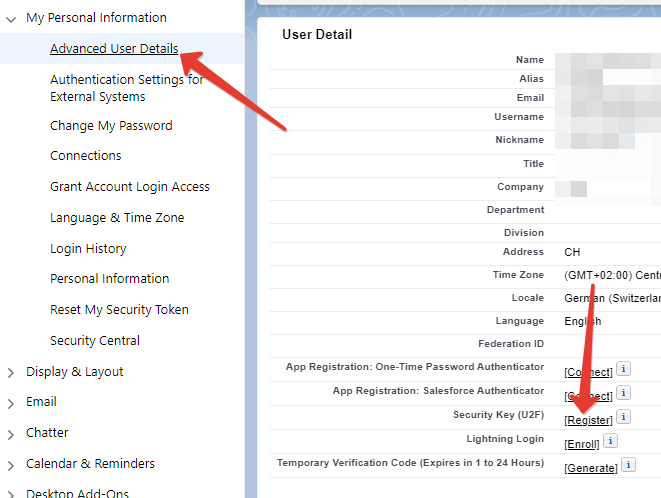
We have guides for many popular services, but they are mainly in English and French only and the list is far from being complete. As FIDO2 keys are based on common standards, you dont have to rely on our manuals only : systems having this feature available usually have their own enrollment guides as well, and often in many more languages. See the examples for Facebook, Google, ProtonMail.
3. Enroll Your Key
Once you've located the right option in your service's settings, it's time to enroll your FIDO2 key. This process ensures that your key is recognized and associated with your account for future logins.
Add Your Key:
- Follow the service’s prompts to start the registration process. This typically involves inserting your FIDO2 key into a USB port or connecting it via NFC if supported.
- Complete any additional steps required by the service, such as naming your key or confirming the registration through a verification prompt.
Register Multiple Keys:
- It is advisable to enroll more than one FIDO2 key to provide a backup in case your primary key is lost, stolen, or damaged.
- Repeat the registration process for each additional key you wish to use, ensuring each one is properly enrolled in your account settings.
4. Platform Passkeys vs. External FIDO2 Keys
Some browsers and operating systems come with built-in platform passkeys, which are integrated into your device (e.g., part of the motherboard). These are often referred to as "built-in" FIDO2 keys and may be used by default when enrolling or logging in.
Platform Passkeys:
- Platform passkeys are designed to provide a seamless and secure authentication experience without needing external hardware.
- When you attempt to log in or enroll a new device, the system might automatically default to using these built-in passkeys if they are available.
Using External FIDO2 Keys:
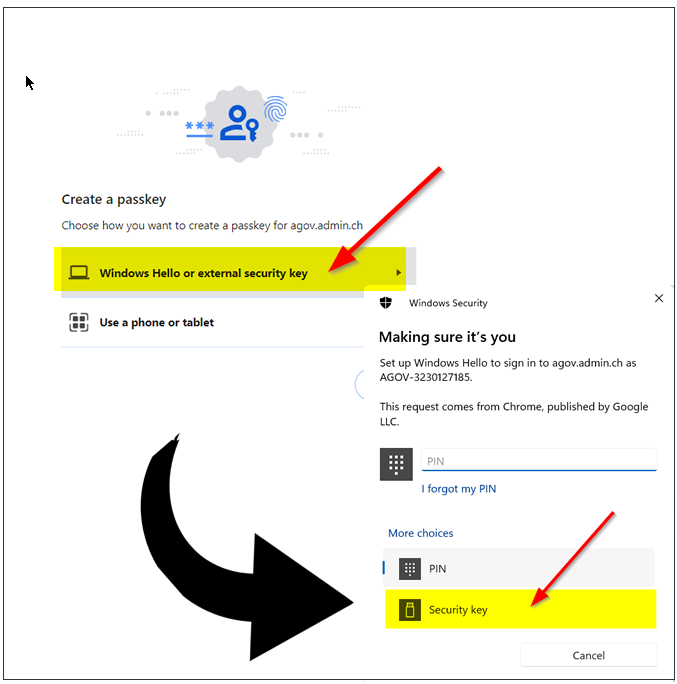
- If you wish to use an external FIDO2 key instead of the platform passkeys, you may need to explicitly select it during the authentication or registration process.
- Look for an option like "External Key", "Security Key", "Use a different key" or a similar choice to specify that you want to use your external FIDO2 key rather than the built-in passkey.
- Ensure that your external key is properly inserted or paired with your device as per the instructions given by the service.
Example 1: M365 Account, Windows, Chrome
Example 2: Consumer Microsoft Account, Windows, Edge

5. Use Your Key to Log In
Using your FIDO2 key to log in involves a few simple steps. This ensures that your key is working correctly and provides the enhanced security it is designed to offer. Depending on the authentication service's settings, you may need to enter your username and, in some cases, your password before being prompted to use FIDO2 keys (FIDO2 as the second factor). Some systems will offer a separate option to log in directly using only passkeys/security keys (Passwordless mode):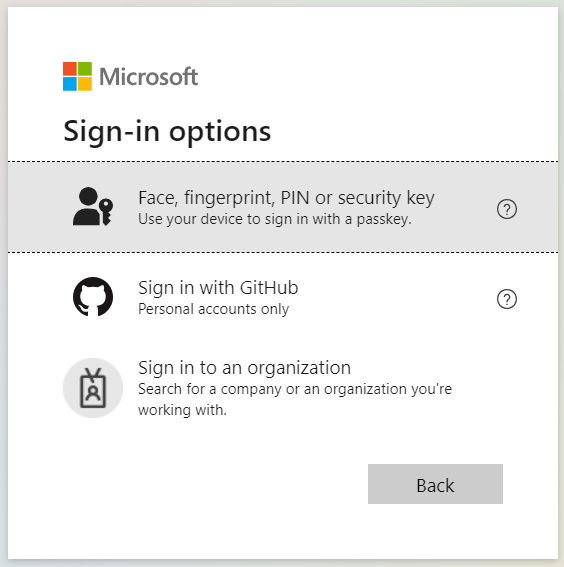
Insert Your Key:
- When prompted during the login process, insert your FIDO2 key into the appropriate port on your device. If using a key with NFC or Bluetooth, ensure it is in range or properly paired.
- In many cases, if multiple passkey-capable devices are available on the system, the security key will blink, prompting the user to touch the key that is needed.
Authenticate:
- Depending on the specific features of your security key, you may be required to provide an additional form of authentication. This could include methods such as scanning your fingerprint or entering a PIN.
These measures are in place to enhance the security of your account. Please make sure to follow the on-screen prompts carefully to successfully complete this step and ensure that your key is properly authenticated. - If your security key is equipped with biometric capabilities, you will be prompted to scan your fingerprint.
This process typically involves placing your finger on the designated sensor until the key successfully recognizes it.
On the other hand, if your key requires a PIN for authentication, you will receive a prompt asking you to enter your chosen PIN. Make sure to input the correct number to proceed, as an incorrect entry may delay the authentication process.
Summary
This guide provides an overview of the standard steps involved in setting up and using FIDO2 security keys. While the specific steps may vary slightly depending on the service, the process is generally simple and intuitive. In most cases, users can set up their security keys without needing detailed instructions. The user-friendly design of both the keys and the services they are used with ensures a straightforward experience for enhancing account security.
You can also check this blog post from Compass Security, which covers a couple of different services with practical thoughts and real-life use cases.
Subscribe to our mailing list
Want to keep up-to-date with the latest Token2 news, projects and events? Join our mailing list!